DIY Basic T-Shirt Weaving - 2 Ways
Learn how to transform your t-shirt by cutting and braiding! This DIY tutorial will show you 2 different types of weaves: basic laddering, and chain weaving.
Today's video is part two of making this asymmetrical top. I'm going to show you how to take the a slashed back shirt we made in last week's video, and transform it using a technique I call weaving. It's also called braiding or laddering.
To see the first steps on how I made this one shoulder top, watch this video.
Let's get started!
1. Lie your shirt flat with the back side facing you. Then, fold it in half the long way so that your side seam is now in the middle of the shirt.
2. Now, let's cut stips all the way down the back. When cutting down the back, only cut in half as far is what you want the whole opening to be. I want my whole opening to be about eight inches wide, so I'm only going to cut in four inches. A quicker way to do this without having to mark your chalk all the way down is to just place the ruler four inches in and cut in until you get to the ruler.
3. Next, unfold the shirt and stretch out the strips you just cut until they roll into tiny ropes.
4. Now it's time to start weaving! View a diagram of both types of weaves and then I'll demonstrate them for you.

5. To start, take the strand below the first strand and put it underneath and then over the strand above it. Grab the next one down, and pull it through the loop you just created, and then over the strand above it. Repeat this process all the way down.

6. When you get to the bottom, cut the bottom loop in half and tie it around the previous loop.
Look at that nice weave you've got now! You can get really creative with this. See how I've done it down the side of this shirt as well. All you have to do is cut strips going down the side and do that same ladder pattern.
Now, I'm going to show you that same weaving pattern, but with a twist. It's called chain weaving because it makes a chain down the middle of the ladder. See the diagram below.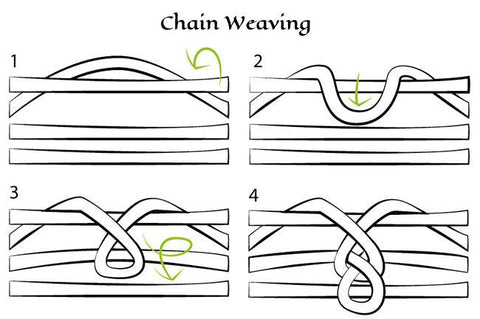
This option takes the strand underneath, put its over the one above, and then before you put strand through the loop, you twist the loop. That is the only difference from the original ladder. Keep repeating it until you get to the bottom, and tie it off like before.
Now you have that same exact laddering effect, but with the twist. The twist helps keep the chain in place so that it will stay right in the middle of your weave.
Thanks for joining me today and learning how to make an asymmetrical top with bows down the side, and now a weave down the back. In this fun outfit you'll be ready for your next festival... (or maybe just a socially distanced party in your own backyard).
For more cool projects, download my free DIY T-Shirt Hacks Ebook

