


Upcycle Oversized T-Shirt into a Corset Top
This DIY tutorial will show you how to upcycle a men's large oversized t shirt to fit you perfectly. T shirt transformation no sew projects are fun and easy to do. This corset back style will hug your curves and look fancy. Hooray for DIY fashion hacks!
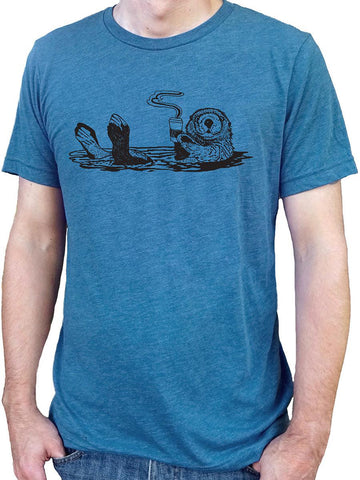
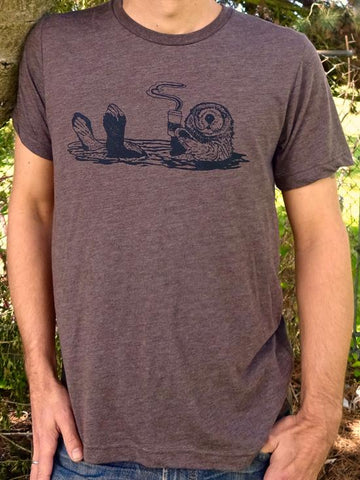
I picked up this shirt in Austin Texas while visiting a friend. I think the design is really cute but it was really large and not fitted at all so I added two rows of corseting and it really just brought it in and now it fits me so much better. That's what I'm going to show you!
1. Make two rows of cuts down the back of your t-shirt. The cuts should be 3 inches wide and 1 inch apart from each other. Fold your shirt so that you are cutting both rows at the same time. Make your very first cut at the top of your rows only half as wide as the rest. When you make the ladder weave it will pull down quite a bit, and can make this top hole too big, so I start with it smaller. Make sure to stretch your cut strips until they curl before we begin braiding (or weaving).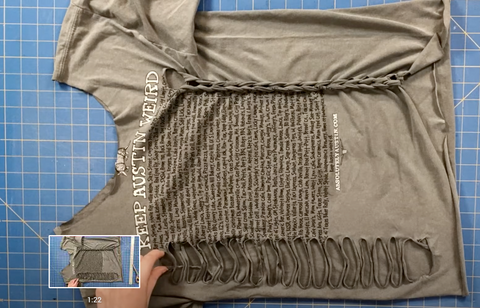
2. We're going to use a basic ladder weave for this project. If you want an in depth tutorial on this, please see my Weaving 101 video. Start your weave by putting the piece underneath it through the top hole. Then pull it over and put the next strand through the hole. See diagram below.

Then, repeat all the way down. What I like to do to make this even easier, is I put my fingers through the hole and I just hand the next one to my fingers. It will bunch up while you're doing this, but just pull it tight. When you get to the bottom, cut the last loop in half with your scissors, and tie it around the loop above it with a square knot. Then, cut off the extra tails on the end of the knot.
3. Repeat this same process for the cuts on the other side of the back of your shirt.
4. See how it's brought everything in and up, so now this shirt is no longer too long and too wide. 
5. Next, let's do a little weave on the sleeves since they are also too big. I'm going to measure 1 and 1/2 inches in for the cuts so that they end up being 3 inches wide when unfolded, matching the size of the weave on the back of the shirt. The cuts are going to be 1 inch apart as well. Let's stretch these out and now we can weave them.

6. Weave all the way down the sleeve, and cut your last loop in half to tie it off. For this sleeve I'm going to do a little trick I call the lobster claw. Take the two pieces that you've cut and you cut them in half horizontally and it makes this little claw. I started it that as a way to explain it to people in my class and just remember how to do it. It really does help people remember having a funny name. 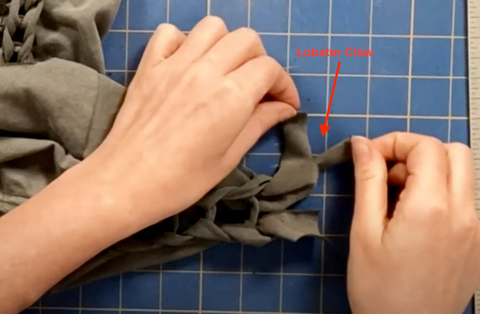
Then you just tie both ends of your lobster claw around that bottom string and this keeps the weave in place better.
Repeat this process for the other sleeve, and you're all done!
I hope you enjoyed today's video on how to make this fun DIY corset back t-shirt. It's a great way to fix any shirt that might be a little bit too big for you. I started out with a men's small shirt and made it fit me so much better. I really am enjoying this was a souvenir tee that I got in Austin, it says keep Austin weird. And it has a bunch of small businesses on the back and I am all about supporting small businesses.
For more cool projects, download my free DIY T-Shirt Hacks Ebook